Step 1: I remove all the factory paint by using cellulose thinner, using a cotton ear bud I slowly remove the paint.
For a resin head I will give it a spray coat of skull white or a brown spray paint for darker skin.
Step 2: I now use a Foundation paint called Tallern Flesh I water it down to. 1 Part Paint to 2 parts water. You may have to repeat this process 2 to 3 times to get the coat perfect. By doing this you wont get any brush marks.

Step 3: Washes. I add Baal Red wash to both sides of the Nose, around the hair line, to the inner ear, on the cheeks and to the lips and in the eyes. Next Thraka Green wash is added under the brow and on the stubble. The final wash is Asurmen Blue which again is added to stubble and under the brow. Ogryn Flesh is added into nostrils
Step 4: At this point you may want to spray the whole head with a Matt Varnish, I use Purity Seal. Its now time to knock some of the washes back. For this I use Dwarf Flesh mixed with a little Tallern Flesh watered down to 1 part paint to 2 parts water. Then using Dwarf flesh on its own watered down to 1 part paint to 2 parts water.
If the Character has a beard you will want to start adding either Devlan Mud wash or Ogryn Flesh wash at this point.
Finally you will add Elf Flesh Watered down to 1 part paint to 2 parts water.
After you have done the final wash of Elf flesh its time to start adding the details. For this I use Ogryn Flesh wash, add this to the creases of the skin, and softy around the eyes, this will bring the details out of the sculpt.

Step 5: Add skull white to the eyes. leaving a little of the red showing around the shape of the eye, but make sure the red is not to strong, unless you want the sculpt to look tired.

Step 6: Creating a Beard or a Buzz Cut look. For this i use layer upon layer of Devlan Mud wash and Badab Black, this way it still shows the skin colour underneath the hair. This worked better than painting it dark to start with then knocking it back.

Step 7: Creating eyebrows again for this depending on the colour I will only use layer upon layer of Devlan Mud wash, Ogryn Flesh and Badab Black, This makes the Eye brows look softer.

Step 8: The Eyes. Depending on the Colour you need the eyes to be the same thing applies. First add Chaos Black to create the Iris of the eye. For this figure my next colour would be Shadow grey, I paint a smaller circle leaving a slight black outline around the whole Iris. Than add Skull white to your colour roughly 2 parts of your colour to one part skull white. Paint a C-shape at the bottom part of the Iris. Now add 1 part of your colour to 2 parts Skull white paint a slightly thinner C-shape add the bottom of the Iris. Finally add a small circle creating the pupil using Chaos Black.

Step 9: Now add a light drybrush of Elf flesh to the brow the nose, around the sides of the temple and eye sockets by the cheeks and around the ears.


Step 10: Camo paint. To create this I use washes layer by layer first layer Ogryn Flesh followed by Devlan Mud, Thraka Green with a little Gryphonne Sepia. Again at this stage you might want to Spray the Matt Varnish to seal the paint to the sculpt.


Step 11: The hair. There are many ways to paint hair depending on the colour of it! The main point you need to think about is look at the darkest colour of the hair and start there, each stage make it lighter and lighter with a series of drybrushing.
Finally add Gloss Varnish to the eyes at least 3 coats. Lips 1 coat.
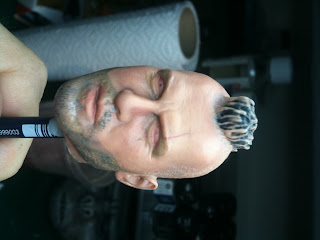
So there you have it a complete 1:6 head.


 I hope this helps you out, any questions please feel free to ask me! Im always happy to help out! Happy Painting!
Greggo
 |

Step 3: Washes. I add Baal Red wash to both sides of the Nose, around the hair line, to the inner ear, on the cheeks and to the lips and in the eyes. Next Thraka Green wash is added under the brow and on the stubble. The final wash is Asurmen Blue which again is added to stubble and under the brow. Ogryn Flesh is added into nostrils

Step 4: At this point you may want to spray the whole head with a Matt Varnish, I use Purity Seal. Its now time to knock some of the washes back. For this I use Dwarf Flesh mixed with a little Tallern Flesh watered down to 1 part paint to 2 parts water. Then using Dwarf flesh on its own watered down to 1 part paint to 2 parts water.
If the Character has a beard you will want to start adding either Devlan Mud wash or Ogryn Flesh wash at this point.
Finally you will add Elf Flesh Watered down to 1 part paint to 2 parts water.
After you have done the final wash of Elf flesh its time to start adding the details. For this I use Ogryn Flesh wash, add this to the creases of the skin, and softy around the eyes, this will bring the details out of the sculpt.


Step 6: Creating a Beard or a Buzz Cut look. For this i use layer upon layer of Devlan Mud wash and Badab Black, this way it still shows the skin colour underneath the hair. This worked better than painting it dark to start with then knocking it back.

Step 7: Creating eyebrows again for this depending on the colour I will only use layer upon layer of Devlan Mud wash, Ogryn Flesh and Badab Black, This makes the Eye brows look softer.

Step 8: The Eyes. Depending on the Colour you need the eyes to be the same thing applies. First add Chaos Black to create the Iris of the eye. For this figure my next colour would be Shadow grey, I paint a smaller circle leaving a slight black outline around the whole Iris. Than add Skull white to your colour roughly 2 parts of your colour to one part skull white. Paint a C-shape at the bottom part of the Iris. Now add 1 part of your colour to 2 parts Skull white paint a slightly thinner C-shape add the bottom of the Iris. Finally add a small circle creating the pupil using Chaos Black.

Step 9: Now add a light drybrush of Elf flesh to the brow the nose, around the sides of the temple and eye sockets by the cheeks and around the ears.


Step 10: Camo paint. To create this I use washes layer by layer first layer Ogryn Flesh followed by Devlan Mud, Thraka Green with a little Gryphonne Sepia. Again at this stage you might want to Spray the Matt Varnish to seal the paint to the sculpt.


Step 11: The hair. There are many ways to paint hair depending on the colour of it! The main point you need to think about is look at the darkest colour of the hair and start there, each stage make it lighter and lighter with a series of drybrushing.
Finally add Gloss Varnish to the eyes at least 3 coats. Lips 1 coat.
So there you have it a complete 1:6 head.


Greggo
Could you make a video
ReplyDeletewhats a good brush to paint in the little eyes lol
ReplyDeletePlus I want to learn to make 1/6 heads where do I begin???
At some point if I have time I will make a video. However I have loads of commissions on at the moment. The best brush I use for eyes is the gamesworkshop fine detail brush. Do you want to learn how to sculpt a head? Or where to buy customs?
ReplyDeleteLove the blog!
ReplyDelete@boot, cheers buddy means a lot we need you to do a blog also unless you already have one lol?
ReplyDeleteWhat should I use to remove the paint from my sideshow bust? It is made out of resin or heavy plaster stone.
ReplyDeletesuperb tut greg, wish my old eyes could manage to paint 1/6 eyes, but no chance....still waitng on your reply about my serang heads bud, may also have a clint eastwood for you to do....cheers matey
ReplyDeletehttp://georgieboy48.blogspot.com/
Hello,
ReplyDeleteThis tutorial is superb. Superb explanation. Wonderful work.
Sorry for my English
Hi,
ReplyDeleteI must say this is by far the best tutorial I have seen, with a great end result to boot! Thank you so much for sharing.
I have been following the instructions and found the tallern flesh to be way darker than shown in step 2. Could it be the paint used was something other than that stated?
ReplyDeleteOh well. Clearly the owner does not read these comments. :-/
ReplyDeleteit was awesome!!!!
ReplyDeleteSO much love for this. Great piece! I'm off to GW tmw to pick up what I need.
ReplyDeleteSO much love for this. Great piece! I'm off to GW tmw to pick up what I need.
ReplyDelete